
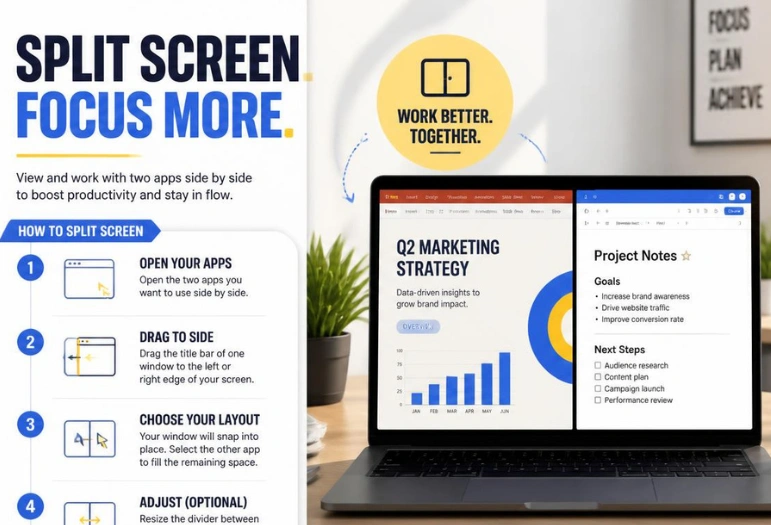
Learning how to split screen lets you keep two or more apps visible without constantly switching between them. You can compare documents, take notes while watching a tutorial, keep email beside a calendar, or research in one window while writing in another. The exact controls differ between Windows, macOS, ChromeOS, Android, and iPadOS, but most modern devices have built-in multitasking tools that require no extra software. More from us: How to check hard drive health.
Quick answer: To split your screen, open the apps or windows you want to use and place the first one against one side of the display. Then select or drag a second app into the remaining space and use the center divider to adjust their sizes.
Split-Screen Methods at a Glance
| Device | Fastest method | Useful shortcut or control |
| Windows 11 | Use Snap Layouts or drag a window to an edge. | Windows + Left/Right Arrow or Windows + Z |
| Mac | Tile a window or use Split View. | Green window button or drag to an edge |
| Chromebook | Snap a window left or right. | Alt + [ or Alt + ] |
| Google Pixel/Android | Open Recents and choose Split screen. | Tap the app icon > Split screen. |
| Samsung Galaxy | Use Recents or Multi Window. | App icon > Open in split-screen view |
| iPadOS 26 | Use Windowed Apps | Drag a second app to the left or right edge. |
| iPhone | No system-wide two-app side-by-side mode | Use Picture in Picture for supported video. |
Split screen is different from using two physical monitors. A split-screen layout divides one display into separate working areas, while an extended desktop spreads your workspace across multiple displays. If one screen no longer gives you enough room, Techixia’s guide to setting up two monitors explains display connections, extend mode, screen arrangement, and troubleshooting.
How to Split Screen on Windows 11
Windows 11 calls its built-in window-arranging feature Snap, and it offers more flexibility than a basic 50/50 split. You can arrange two windows side by side or use Snap Layouts to divide a larger display among three or four apps. Windows also provides keyboard shortcuts, so you do not have to drag windows manually every time.
Method 1: Split the Screen With Your Mouse
- Open the two windows you want to use.
- Click and hold the title bar of the first window.
- Drag it to the far left or right edge of the screen.
- Release the window when the highlighted snap area appears.
- Windows displays your other open apps in the remaining space.
- Click the second window you want to use.
The two windows will now share the display. You can place your pointer over the border between them and drag it to give one app more room. This method is useful when you simply want a browser on one side and a document, spreadsheet, or messaging app on the other.
Method 2: Use Windows Keyboard Shortcuts
Click the window you want to move, then press Windows + Left Arrow to snap it to the left half or Windows + Right Arrow to send it to the right. Select the second window and use the opposite shortcut to fill the remaining half. You can also combine arrow commands to reposition windows in more complex layouts.
Keyboard snapping becomes particularly useful when you repeat the same layout throughout the day. It reduces the amount of precise dragging needed on a laptop trackpad and makes it easier to rebuild your workspace after closing or moving an app. Once the shortcuts become familiar, creating a two-window layout takes only a few seconds.
Method 3: Use Snap Layouts for Two, Three, or Four Windows
Hover over a window’s Maximize button or press Windows + Z to display the available Snap Layouts. Choose the section of the layout where you want the active window, then select other open apps to fill the remaining areas. The layouts available can vary with screen size and resolution, making them especially useful on larger monitors.
This option is better than a simple 50/50 split when you need several pieces of information visible together. For example, you might keep a large document on one side while placing email and a browser in two smaller areas on the other. On a high-resolution monitor, this can provide some of the benefits of multiple displays without adding another screen.
How to Split Screen on Mac
Mac users have two closely related options for how to split screen: regular window tiling and full-screen split view. Current macOS versions let you drag a window toward an edge, use the green window button, choose Window menu commands, or use supported keyboard shortcuts. Regular tiling keeps the windows on the desktop, while Split View places two compatible apps together in a dedicated full-screen space.
Method 1: Tile Two Mac Windows Side by Side
- Open the two windows you want to use.
- Drag the first window toward the left or right edge of the screen.
- Wait for the highlighted placement area to appear.
- Release the window to tile it on that side.
- Move or tile the second window into the remaining half.
You can also hover over the green button in a window and select a left- or right-half option from its window-arrangement controls. This desktop tiling method is convenient when you still want easy access to the menu bar, dock, and other windows. macOS settings can also control whether dragging a window to the edge automatically activates tiling.
Method 2: Use Full-Screen Split View
Hover over the green button in the top-left corner of the first window, open the Full Screen options, and choose Left of Screen or Right of Screen. Click the second app on the opposite side when macOS asks you to choose another window. macOS then places both apps together in a dedicated desktop space.
You can drag the separator to give either app more room while remaining in split view. Mission Control can help you switch between the Split View Space and your other desktops, and you can replace one side with a different compatible app when needed. This setup is particularly useful when you want two applications to occupy the display without unrelated windows getting in the way.
How to Split Screen on a Chromebook
ChromeOS includes window snapping, so Chromebook users can create a two-window workspace without installing an extension. You can drag a window to an edge, use the layout menu near the Maximize button, or use keyboard shortcuts. Newer ChromeOS versions can also organize snapped windows into groups for easier multitasking.
Use the Drag-and-Drop Method
- Open both windows or apps.
- Click and hold the title bar of the first window.
- Drag it toward the left or right edge.
- Release it when that side of the screen highlights.
- Select the second window from the suggestions.
You can resize the pair by dragging the edge between the windows. To return a window to its previous size, use the Maximize control again. ChromeOS can also support layouts that give one app more space than the other instead of dividing the display evenly.
Use Chromebook Keyboard Shortcuts
Press Alt + [ to move the active window to the left or Alt + ] to move it to the right. Apply the opposite shortcut to your second window if ChromeOS does not automatically offer it as a pairing choice. These shortcuts provide one of the fastest ways to arrange a Chromebook without relying on a mouse or touchscreen.
Chromebook tablets and convertible models support split-screen gestures as well. In tablet mode, you can open the window overview and drag a window toward one side, then choose another app for the remaining area. The divider can then be moved to adjust the amount of space given to each app.
How to Split Screen on Android
Android supports multi-window layouts, although the exact controls can differ between manufacturers and software versions. On Google Pixel phones, the standard approach is to open the recent apps overview, choose an app, and select Split screen from the app’s menu. Other Android brands often use a similar process but may label individual controls differently.
Google Pixel and Similar Android Phones
- Open the first app you want to use.
- Swipe up from the bottom and hold to open Recent apps.
- Tap the app icon above its preview.
- Choose Split screen.
- Select the second app.
- Drag the divider to resize the two apps.
Dragging the divider all the way toward one edge can close the split and return the remaining app to a full-screen layout. Some applications may not offer the split-screen option because their interfaces do not support multi-window use. The available menu wording can also vary slightly across Android brands and versions.
How to Use Split Screen on Samsung Galaxy Phones
Samsung calls its multitasking system Multi-window and adds several controls beyond the standard Android split screen. A straightforward method is to open Recents, tap the icon above the app you want, and choose Open in split screen view. You can then select a second compatible app and adjust the layout with the divider.
Galaxy devices can also create app pairs for combinations you use frequently. Samsung provides Edge panel and drag-and-drop options on compatible phones and tablets, while newer One UI versions can offer an optional two-finger swipe gesture for entering split-screen mode. Available controls can differ by Galaxy model, carrier, and software version, so the Recents method remains the most broadly recognizable starting point.
An app pair is useful when the same two applications repeatedly appear in your workflow. You could pair Maps with Messages, a browser with Notes, or email with a calendar and reopen the combination more quickly later. Foldable Galaxy devices and larger tablets may provide additional layouts because they have more display area available.
How to Split Screen on iPadOS 26
Apple substantially changed iPad multitasking with iPadOS 26, so instructions written for older versions can now be confusing. The current system emphasizes windowed apps, allowing compatible applications to behave more like resizable desktop windows. You can enable Windowed Apps through Settings > Multitasking & Gestures before arranging multiple apps.
Put Two iPad Apps Side by Side
- Open Settings.
- Tap Multitasking & Gestures.
- Select Windowed Apps.
- Open the first app.
- Bring up the Dock, App Library, or Spotlight.
- Drag the second app toward the left or right edge.
- Release it when the side-by-side placement appears.
- Drag the middle bar to resize the apps.
You can also move already-open windows toward opposite sides of the display. Window controls can minimize, close, enlarge, and rearrange apps, giving newer iPadOS versions a more desktop-like workflow than older iPad multitasking systems. Depending on your exact iPadOS release and device, additional multitasking controls may also be available.
The larger the iPad display, the more practical this style of multitasking becomes. A keyboard and pointing device can also make window management feel more natural during longer work sessions. If a tablet or laptop forms part of your permanent workspace, Techixia’s guide to setting up a home office covers screen positioning, desks, lighting, and practical workspace planning.
Can You Split Screen on an iPhone?
An iPhone does not provide the same system-wide two-app side-by-side workspace offered by iPadOS, Android, Windows, or macOS. Apple’s iPhone multitasking tools instead include Picture in Picture, which can keep supported video in a small floating window while you use another app. The floating video can usually be resized, moved to another area, temporarily hidden, or returned to full screen.
Picture in Picture is useful for watching a tutorial while taking notes or continuing a supported video call while checking another application. It is not the same as giving two full apps equal halves of the display, so instructions claiming to enable a standard iPhone split screen should be treated carefully. Third-party apps may create their own divided interfaces, but they cannot turn iOS into the same system-level two-app layout available on an iPad.
How to Split Two Browser Windows
If you want two websites side by side on a Windows PC, Mac, or Chromebook, you generally do not need a special browser feature. Open the second page in a separate browser window, then use the operating system’s normal Snap, tiling, or split-screen controls to place the two windows next to each other. This works well for comparing prices, copying information between sites, or keeping reference material visible while completing an online form.
Some tablets also allow browser tabs or windows to be placed beside each other using the device’s built-in multitasking controls. The exact process depends on the browser, operating system version, and screen size. If that option is unavailable, opening a browser on one side and another compatible app on the other usually provides a similar workflow.
How to Resize or Exit Split Screen
Most operating systems place a divider or boundary between the two active windows. Dragging that boundary lets you make one side larger when an equal split is not practical, although the available size ratios depend on the device and apps. To exit, maximize one window, drag the divider to an edge where supported, or use the platform’s full-screen or restore control.
A 50/50 split works well for comparison tasks, but it is not always the most comfortable arrangement. Writing beside a narrow reference page may work better at roughly two-thirds and one-third, while spreadsheets and design tools often benefit from more room. The best layout is the one that keeps essential controls readable without requiring constant resizing or scrolling.
Why Split Screen Is Not Working
A missing split-screen option usually means a setting is disabled, the application does not support the requested layout, or the operating system uses a different multitasking control. Start with the built-in settings before installing third-party window-management software. The following checks solve many of the common causes.
- Windows 11: Open Settings > System > Multitasking and confirm Snap windows is enabled.
- Mac: Open System Settings > Desktop & Dock and review the window-tiling options if dragging to an edge does nothing.
- Mac with multiple displays: Review the Spaces and display settings if full-screen apps or tiled windows are behaving differently across monitors.
- Chromebook: Make sure both windows are on the same desk and display when trying to pair them.
- Android: Try another app because some applications do not support split-screen mode.
- Samsung Galaxy: Check Settings > Advanced features > Multi window if you want to use Samsung’s optional multitasking gestures.
- iPadOS 26: Open Settings > Multitasking & Gestures and make sure Windowed Apps is selected.
Screen size can also make a technically supported split feel unusable. Two dense desktop programs may fit comfortably on a 27-inch monitor but become cramped on a small laptop, while phone apps usually have much less space to share. If multitasking is part of your work all day, adding another physical display may be more useful than squeezing increasingly small windows onto one panel.
When Split Screen Is Better Than a Second Monitor
A split screen is ideal when you only need two or three windows visible temporarily. It costs nothing, works on a laptop away from your desk, and can be activated or dismissed in seconds. It is particularly useful for studying, research, writing, video calls, online shopping comparisons, and copying information between applications.
A second monitor becomes more attractive when several apps must stay visible for hours at a time. Developers, designers, analysts, video editors, streamers, and people who work with large spreadsheets often benefit from the extra physical display area. If you plan to connect a monitor through USB-C or a dock, Techixia’s USB cable guide can help you understand connector types, data speeds, charging support, and why some USB-C connections can carry video while others cannot.
The Bottom Line
Knowing how to split screen is mostly a matter of learning the window-management tool your device already provides. Windows uses Snap, macOS and ChromeOS offer window tiling, Android uses multi-window controls, Samsung adds Multi Window, and iPadOS 26 provides a more flexible windowing system. Start with the built-in shortcut or drag gesture for your platform, then adjust the divider until both apps have enough room to work comfortably.
If two windows still feel cramped, the limitation may be the physical size of the display rather than the software. In that situation, an external monitor or full dual-display setup can create a much more practical workspace. Either way, arranging your apps intentionally can reduce unnecessary switching and make everyday multitasking easier.
Frequently Asked Questions
What Is the Fastest Way to Split Screen on Windows?
The fastest keyboard method on Windows is usually Windows + Left Arrow or Windows + Right Arrow. Windows 11 users can also press Windows + Z to open Snap Layouts when they need something more complex than two equal halves. Both methods use Windows’ built-in Snap system and require no additional software.
Can I Split My Screen Into Three or Four Windows?
Yes, desktop operating systems can support layouts with more than two windows. Windows 11 provides Snap Layouts for several arrangements, while current macOS window tiling can support multiple window positions. Whether a three- or four-window layout is comfortable depends heavily on your display size, resolution, and the applications you are using.
Does Split Screen Slow Down a Computer?
The split-screen feature itself does not normally create a significant performance problem because it mainly changes the position and size of windows. However, running several demanding applications simultaneously can use more memory, processor time, and graphics resources regardless of how their windows are arranged. If performance drops, close unnecessary programs and browser tabs before assuming the layout itself is responsible.
Can Every Android App Use Split Screen?
No, support varies by application and device. Some apps restrict multi-window use or do not adapt well to a smaller portion of the screen, which is why the option may be missing for certain programs. Try another compatible app before changing system settings or installing a third-party multitasking tool.
Is Split Screen Available on iPadOS 26?
Yes, although Apple changed the way iPad multitasking works. iPadOS 26 emphasizes a broader windowing system that lets compatible apps be moved, resized, and placed side by side. You can start by enabling Windowed Apps under Settings > Multitasking & Gestures and then arranging the apps you want to use together.
Can You Split Screen on an iPhone?
Not in the same system-wide side-by-side way available on an iPad or many Android devices. iPhones support tools such as Picture in Picture for compatible video while another application remains open. That provides limited multitasking, but the two applications do not occupy equal independent sections of the screen.